
Want to set up Custom iFrame in Elementor? With this plugin, you can easily embed external content like videos, maps, and third-party tools on your website. This guide will walk you through the simple steps to get started and enhance your site’s functionality.
Not a fan of reading? No worries — we’ve got a video tutorial for you. 📺
Not a video person? No worries — scroll on for the full step-by-step guide.
Step 1: Install and Activate Custom iFrame Plugin
To get started, you need to install and activate Custom iFrame plugin. You can follow Intro & Installation doc guide for detailed process.
However, here’s the simple way:
- Go to your WordPress dashboard.
- Navigate to Plugins > Add New.
- In the search bar, type ‘Custom iFrame by Coderz Studio‘ and hit the enter.
- Click Install Now, then click Activate.

Step 2: Add Custom iFrame widget on Elementor Page
Once Custom iFrame plugin is activated:
- Navigate to the page or post where you want to add the Custom iFrame.
- Click Edit with Elementor to launch the Elementor editor.
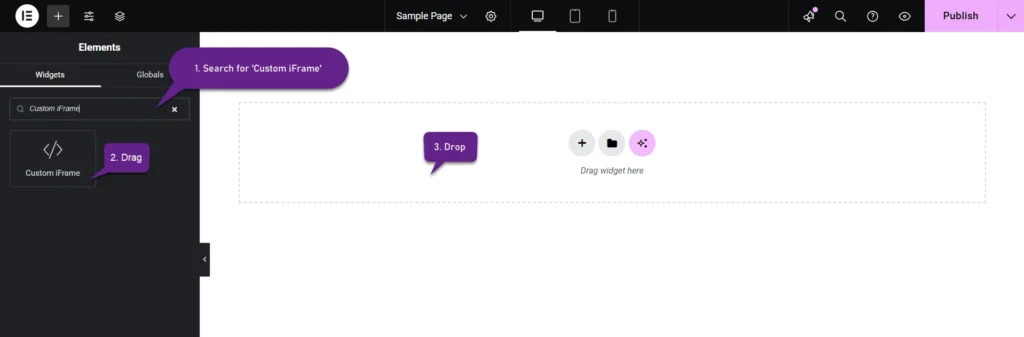
- In the Elementor editor, look for the Custom iFrame widget. You can find it by searching for “Custom iFrame” in the search bar on the left panel.
- Drag and drop the Custom iFrame widget into the section where you want to display the content.
Step 3: Set Up Custom iFrame in Elementor
Now that the widget is in place, it’s time to configure the Content settings:

Content Source (URL):
Add the URL of the content you want to embed. Whether it’s a YouTube video, a Google Map, or another webpage, simply paste the URL here.
Custom ID:
Assign a unique ID to your iFrame for applying custom CSS or JavaScript. This allows you to style or control the iFrame more efficiently. If left empty, an ID will be automatically generated.
Height:
Adjust the Height of the iFrame to fit your design. You can input exact pixel values (e.g., 600px) or use percentages for a more flexible, responsive design.
Auto Height:
The Auto Height option adjusts the iFrame’s height automatically to fit its content, ensuring a clean and responsive layout. It’s ideal for dynamic content like forms or pages with varying sizes.
Show Scrollbar:
Enable or disable the scrollbar within the iFrame. Use it to allow users to scroll through overflowing content inside the iFrame or hide it for a cleaner look if the content fits perfectly.
Refresh Interval (seconds):
Set a time interval to automatically reload the iFrame content. This is useful for keeping dynamic content like live data, news feeds, or dashboards updated without manual refreshes.
Step 4: Set up the iFrame Smart Load
Smart Load is a feature that helps improve page load times by delaying the loading of the iFrame until it’s about to be visible on the screen.
Enable Lazy Load and select the placeholder Image.
The placeholder image improves user experience by showing a visual cue instead of a blank space while the iFrame content loads.

Step 5: Set Up the Style of iFrame
Padding:
The Padding settings let you control the spacing between the iFrame content and its container using px (pixels), em (relative to font size), or % (percentage of the container width) for precise spacing control.
Link Values: By enabling this option, you can apply the same padding value to all sides simultaneously. This saves time when you need consistent spacing around the iFrame.
Alignment:
Choose the alignment of the iFrame within its container—Left, Center, or Right—to match your page layout and design preferences.
Container Width:
Set the width of the iFrame container using px (pixels), % (percentage), or vw (viewport width) to control how it adapts to different screen sizes.

Border Style Set up:
The Border Settings allow you to customize the appearance of the iframe’s border for better design and seamless integration with your website.
- Border Type: Select the style of the border, such as Solid, Dashed, Double, Dotted or Groove, to define how the border should look.
- Border Width: Adjust the thickness of the border in pixels for a bold or subtle effect.
- Border Color: Choose a color that complements your website design using the color picker.
- Border Radius: Add rounded corners to the iFrame by specifying a value in pixels. Higher values create more rounded edges.

Box Shadow Style Set up:
The Box Shadow Settings let you add a shadow effect to your iframe for a more dynamic and visually appealing design.
- Color: Choose the shadow color to match or contrast with your design.
- Horizontal: Adjust the horizontal shadow position. Positive values move the shadow to the right, while negative values move it to the left.
- Vertical: Adjust the vertical shadow position. Positive values move the shadow downward, while negative values move it upward.
- Blur: Set the blur intensity to create a soft or sharp shadow. Higher values result in a more diffused shadow.
- Spread: Control the size of the shadow. Positive values increase the shadow size, while negative values shrink it.
- Position: Choose between:
- Outline: The shadow appears outside the iframe.
- Inset: The shadow appears inside the iframe.

This guide covers everything you need to set up and customize your Custom iFrame plugin in Elementor. From lazy loading to styling, you can optimize performance and design with ease. Configure the options based on your needs to enhance functionality and user experience.