
With Custom iFrame, you can embed PDF in Elementor easily. Share brochures, reports, manuals, or any documents directly on your website without forcing users to download them.
Not a fan of reading? No worries — we’ve got a video tutorial for you. 📺
Not a video person? No worries — scroll on for the full step-by-step guide.
Step 1: Install & Activate Custom iFrame Plugin🔌
Let’s start at square one — the classic WordPress plugin hustle:
- Jump into your WordPress dashboard.
- Head to Plugins > Add New.
- Search for “Custom iFrame by Coderz Studio” — we promise we’re cooler than the name sounds 😎.
- Click that ‘Install Now‘ button, then hit ‘Activate‘ like you’re launching a spaceship.
Boom. Plugin is live.

Step 2: Add Custom iFrame widget on Elementor Page➕
Now that the Custom iFrame plugin is ready, let’s get that PDF a comfy spot on your page:
- Navigate to the page or post where you want to add the PDF
- Click Edit with Elementor to launch the Elementor editor.
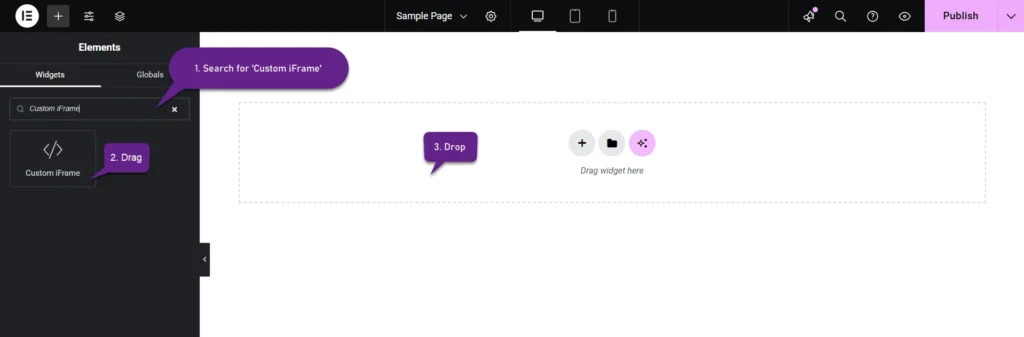
- In the Elementor editor bar, search for “Custom iFrame”. Found it? Great!
- Drag and drop that widget right into the section where the PDF should shine.
Step 3: Embed PDF in Elementor – Right Where It Belongs📄
Alright, time to make your PDF feel right at home — scrollable, and looking sharp right on your page!
- In the Content settings, choose Source Type as PDF — obviously.
- Choose your source:
- File (recommended – gives you more control)
- URL (quick but comes with no toolbar tweaks)
- Set the height to fit your layout — tall, short, or somewhere in between.
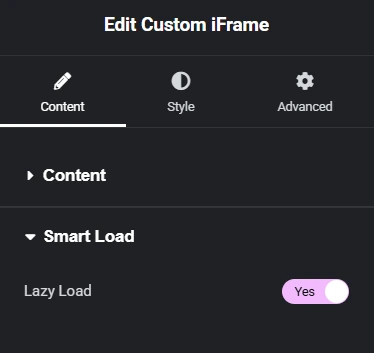
Step 4: Smart Load — Load Only When Needed ⏳
Want faster page loads? Flip the Lazy Load switch to Yes.
This tells your PDF to chill in the background and load only when users scroll to it — saving resources and speeding up the page for your visitors.
It’s perfect for performance — less stress on your site, more speed for your visitors.
Set it to No if you want the PDF to load right away.
One toggle. Big difference.
Step 5: Customize Display Options (PDFs Deserve Style Too)🎨
Let’s make your embedded PDF look and feel just right for your site.
- Theme: Choose the vibe:
- System Default, Light, Dark, or go wild with Custom colors.
- Pick Custom, and you’ll get color pickers to match your brand or mood.
- Zoom: Set the starting zoom level when the PDF loads:
- Go with presets like Actual Size, Page Fit, or Automatic Zoom
- Or set it anywhere from 50% to 400%, if you’re the precision type.
- Default Selection Tool:
- Text Tool (for highlighting & copying), or
- Hand Tool (for grab-and-drag scrolling)
- Default Scrolling: Pick your scroll style:
- Vertical, Horizontal, Wrapped, or Page-by-page.
- Default Spreads: Control how PDF pages are grouped
- No Spreads, Odd, or Even spreads — perfect for booklets or presentations.

One simple panel, and your PDF viewer looks like it belongs on your site — styled, smooth, and totally on brand. ✨
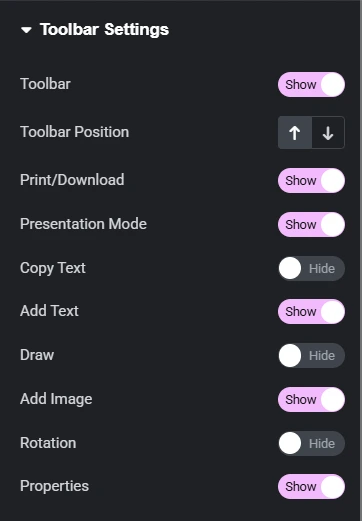
Step 6: Toolbar Settings — Your PDF, Your Rules 🧰
Give your users just the right tools — no more, no less. You’re basically the PDF bouncer now: “Print? You’re in. Rotate? Maybe. Draw tool? Not today.” Just toggle and take charge!
- Toolbar Position: Top or Bottom — pick where the magic bar shows up.
- Print: Let users print the PDF (yes, some still do that).
- Download: Save a copy for later – old-school style.
- Presentation Mode: Fullscreen view = serious presentation vibes.
- Copy Text: Enable text selection and copying (Ctrl+C fans rejoice).
- Add Text: Let users type over the PDF like it’s a fillable form.
- Draw: Freehand scribbling for the creative (or chaotic).
- Add Image: Drop images right onto the PDF.
- Rotate: Spin those pages like a fidget spinner.
- Properties: Show file info like name, size, and page count.
In short — you hold the switches, your PDF follows the rules. Total power, zero drama.
Step 7: Advanced – Add a Custom ID 🛠️
Want to style your iFrame with CSS or sprinkle in some JavaScript magic?
Just pop in a Custom ID (like my-awesome-iframe) and you’re all set!
Leave it blank if you’re feeling chill — we’ll generate one for you automatically. But if you’re planning custom tweaks, naming it gives you the power.
Short, sharp, and dev-friendly.

Step 8: Style the Custom iFrame (Make It Look Sharp)✨
Time to give your iFrame some style! Want to adjust padding, alignment, background, borders, or maybe throw in a dramatic box shadow? We’ve got you.
Check out our full styling guide here:
How to Style Custom iFrame Widget in Elementor?
You’ll be able to control how your iFrame blends into your site — tweak margins, play with colors, and give it that pixel-perfect finish.
Even small style changes can make a big visual impact. Go ahead, give your iFrame the glow-up it deserves!

Step 9: One Click Away from a Glorious PDF Embed in Elementor✅
All set? Hit Update or Publish to bring your beautifully embedded PDF to life on your site.
That’s it — you’ve just learned how to embed PDF in Elementor like a pro (with style, speed, and a sprinkle of fun).
Now go impress your visitors — or at least make your PDFs look way cooler than they used to! 🤝